In the quiet hush of a Hokkaido winter, the world doesn't just sleep; it transforms. As an editor who spends her days obsessing over the intersection of architecture and atmosphere, I’ve always found that the most profound design lessons come from nature’s own transitions. There is a specific kind of magic found at Ueno Farm in Asahikawa, where Sayuki Ueno—the visionary gardener behind some of Japan's most poetic landscapes—practices the art of "Arrested Nature."
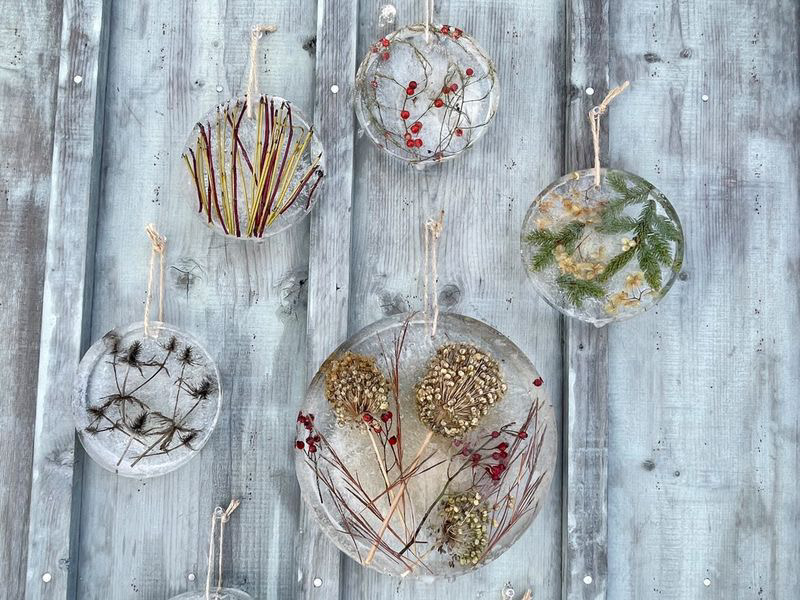
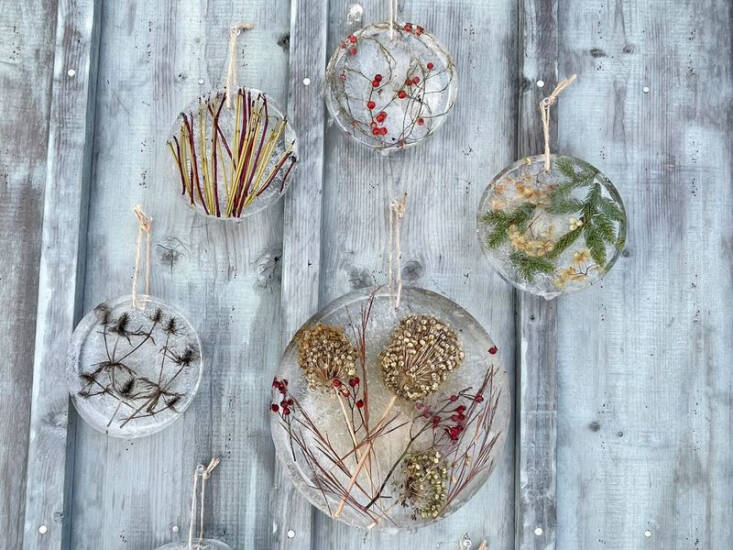
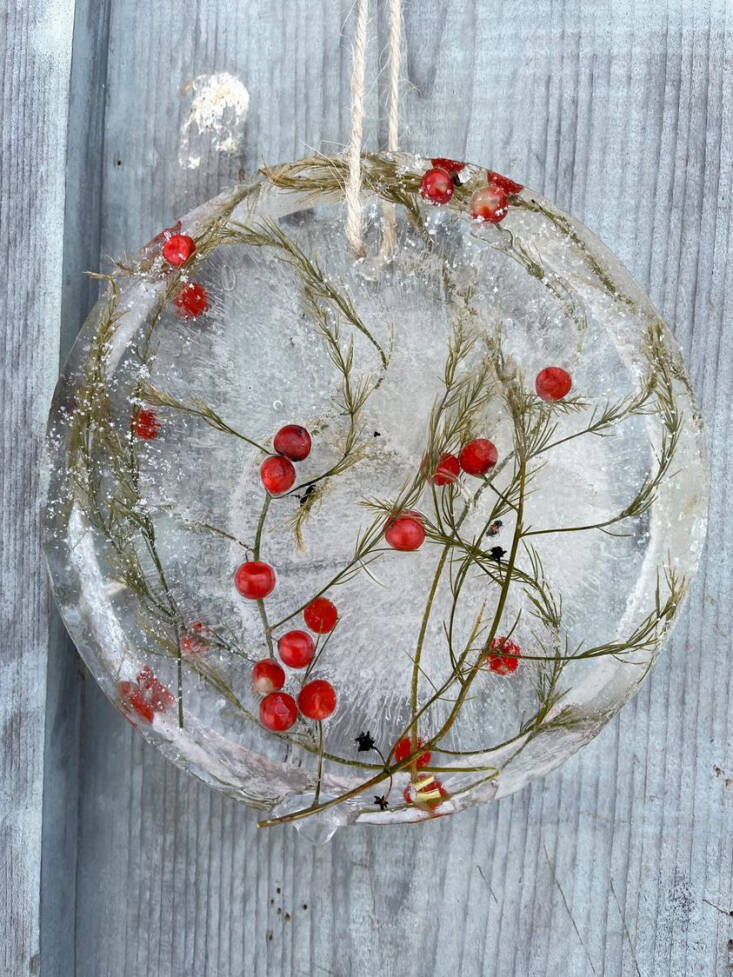
Instead of mourning the end of the blooming season, Ueno celebrates the "frozen garden." She captures the fleeting structural beauty of autumn—a dried hydrangea head, a sprig of vivid red dogwood, or a delicate seed pod—and encases them in crystal-clear ice. These "Frozen Herbariums" are more than just seasonal decorations; they are a Zen exercise in preservation and mindfulness. They bring a stillness into our living spaces (or our winter gardens) that feels both ethereal and deeply grounded. Today, I want to pull back the curtain on this alchemical process, blending the delicate aesthetics of Japanese garden design with the rigorous physics required to achieve that elusive, diamond-like clarity.
What is a Frozen Herbarium?
At its heart, a frozen herbarium is a vessel of time. It is a botanical specimen—often a remnant of the previous season—submerged and frozen within a block of ice to preserve its form and color. While the concept sounds simple, the distinction lies in the intent.
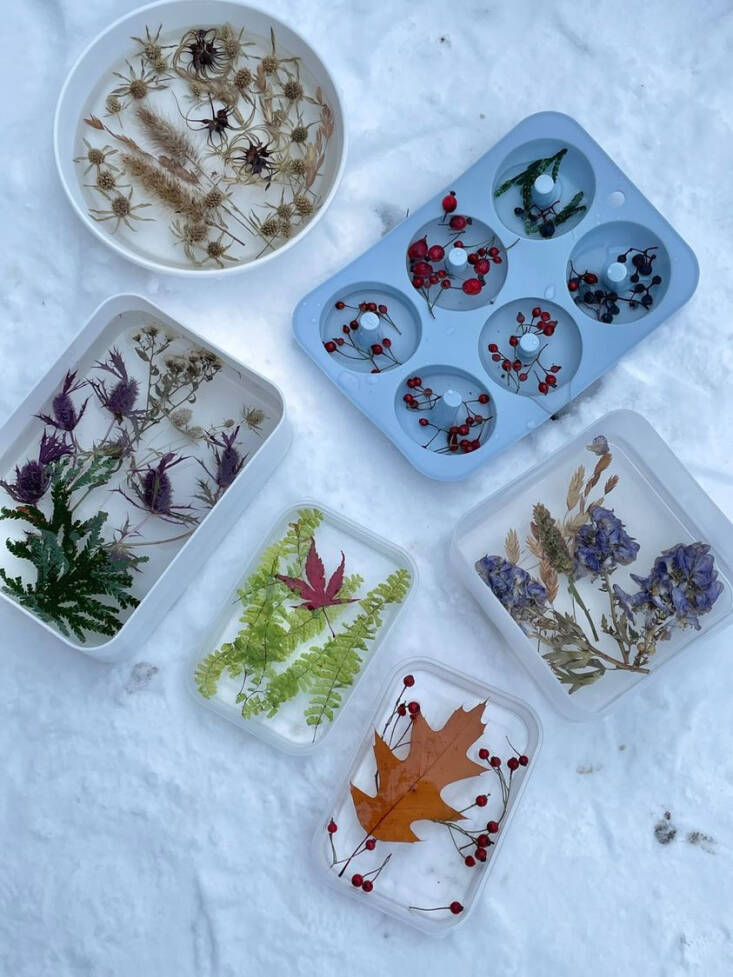
To create a frozen herbarium, you submerge pressed flowers or seed heads in boiled water within a silicone mold and freeze them at temperatures below 14ºF (-10ºC) for maximum structural integrity. Many people confuse these with botanical ice lanterns, but the primary difference between a frozen herbarium and a botanical ice lantern is the display method. While herbariums are meant to be viewed as solid, sculptural artifacts of "arrested nature," lanterns are specifically designed to be backlit with candles or LEDs to highlight the refracted light through the frozen flora. One is a study in preservation; the other is a play of light and shadow.
The Science of Crystal Clarity
The biggest hurdle for any beginner is the dreaded "cloudy center." If you’ve ever looked at a standard ice cube from your freezer, you’ve noticed a white, opaque core. This is caused by dissolved oxygen and minerals being pushed to the center as the water freezes from the outside in. For a professional-grade frozen herbarium, we want the botanical to be the star, not the trapped gas.
The secret to professional-grade results lies in a combination of water chemistry and thermodynamics. Boiled water is preferred for botanical ice art because the boiling process removes a significant portion of dissolved oxygen. When combined with directional freezing—forcing the ice to freeze from the top down—you can increase ice transparency by up to 85% compared to standard tap water freezing.
Furthermore, temperature control is vital. While your home freezer likely sits at 0ºF, the "sweet spot" for botanical art is slightly higher, around 14ºF. This slower freezing process allows the water molecules to align more perfectly, creating a denser, clearer structure that won't crack the moment it's exposed to room temperature.
Materials for Botanical Ice Art
Designing a frozen herbarium is like composing a still life. You aren't just looking for "pretty" flowers; you are looking for texture, silhouette, and "architectural" strength. Soft, high-moisture petals (like pansies) can sometimes bruise or lose color when frozen, whereas structural elements thrive.
I recommend focusing on:
- Structural Twigs: Cornus (dogwood) for its deep reds, or Salix (willow) for its graceful curves.
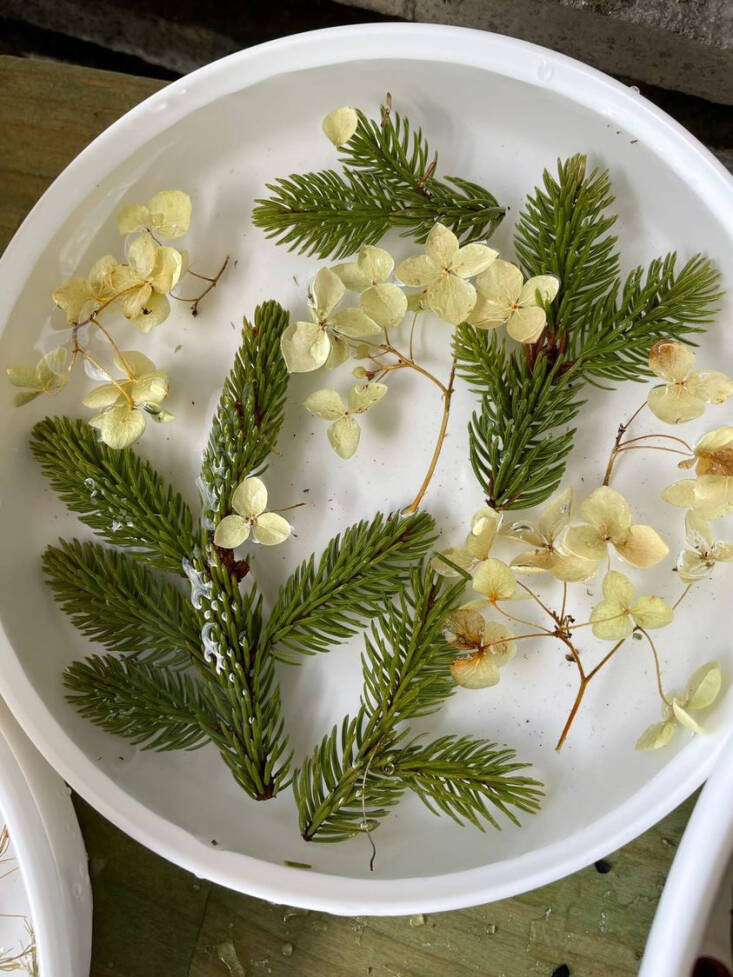
- Conifers: Cedar or pine sprigs provide a lush, dark green backdrop that contrasts beautifully with clear ice.
- Dried Elements: Hydrangea paniculata heads or Allium seed pods offer a "ghostly" aesthetic that feels incredibly modern.
When choosing your mold, consider the physics of melting. Spherical ice molds provide approximately 20% less surface area than cubes of the same volume. This is a crucial statistic for outdoor botanical displays: the less surface area exposed to the air, the slower the melt rate, allowing your artwork to survive a sunny winter afternoon.
Step-by-Step DIY: Creating Your Own Frozen Herbarium
Achieving the Sayuki Ueno look requires patience and a multi-step approach. Here is the refined method I use in my own studio:
- Prepare the Water: Boil filtered water twice. Let it cool slightly between boils, then let it reach room temperature before pouring. This is the foundational step to removing dissolved oxygen.
- The First Layer: Pour about an inch of water into your mold. Place your "heavy" elements here—twigs or stones that will anchor the piece. Freeze this layer first. This prevents your botanicals from all floating to the top in a cluttered mess.
- The Composition: Once the base is slushy or firm, arrange your delicate flowers and seed heads. Use tweezers to tuck them into place.
- The Final Pour: Add the remaining water. To mimic the way a lake freezes naturally, place your mold inside an insulated container (like a small cooler) with the lid slightly ajar. This forces the cold air to hit only the top surface, pushing any remaining air bubbles down and out of the mold's bottom.
- The Release: After 12-24 hours, remove the mold. If using silicone, the ice should pop out easily. If the ice is cloudy at the very bottom, you can "shave" it off with a warm bread knife to reveal the crystal core.
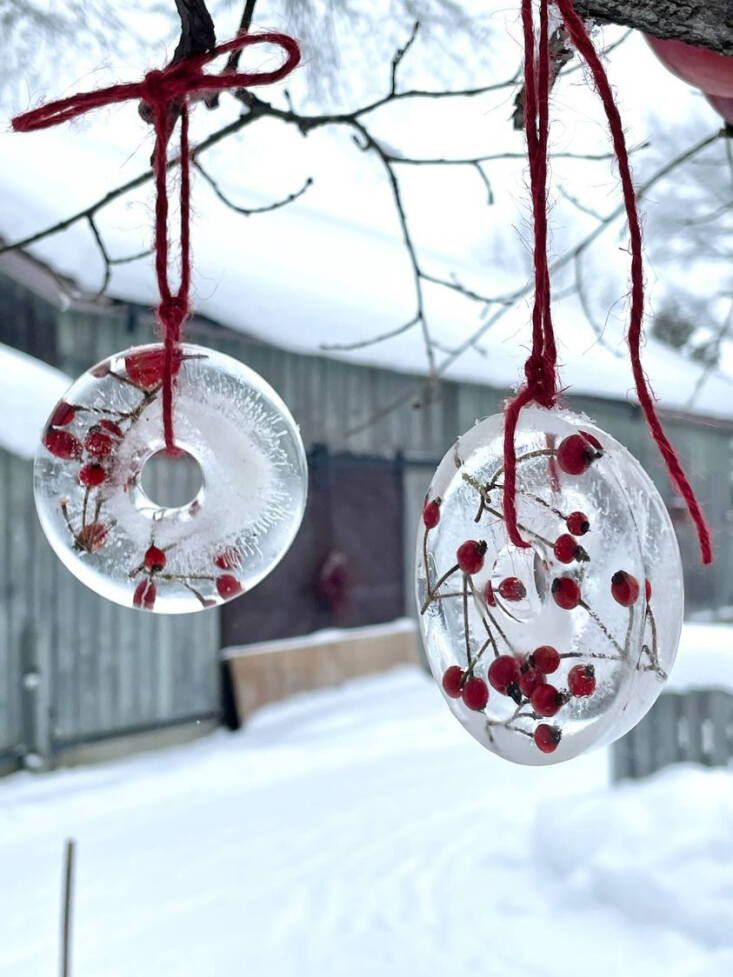
Pro-Tip: If you want to hang your herbarium from a tree limb, place a piece of twine or a hollow straw into the mold before freezing. This creates a ready-made channel for hanging without risking a crack by drilling into the finished ice.
Advanced Techniques: Beyond the Cube
Once you’ve mastered the basic herbarium, you can begin to think about the ecological impact of your art. In Hokkaido, Ueno often incorporates rosehips, mountain ash berries, and sunflower seeds into her ice molds.
These serve a dual purpose: they are visually stunning, providing pops of crimson against the white winter landscape, and they act as slow-release bird feeders. As the sun warms the ice during the day, the berries are gradually exposed, offering a vital food source for native birds like the hiyodori (brown-eared bulbul). It is a beautiful cycle of art returning to the earth to sustain life.
For those looking for a larger statement piece, the "Cooler Method" is the gold standard. By filling a large, hard-sided cooler with water and leaving the lid off in a freezing garage, you create a massive block of clear ice. You can then use a small chainsaw or a Japanese ice saw to hand-carve a "monolith" herbarium for an entryway or a patio.
Professional Tools for Perfect Clarity
While you can certainly use Tupperware, dedicated clear ice systems make the process much more repeatable. If you're serious about this hobby, investing in a high-quality mold is the difference between "crafty" and "curated."
| Mold System | Best For | Clarity Rating | Ivy’s Take |
|---|---|---|---|
| True Cubes | 2" Architectural Cubes | 95% | The gold standard for geometric precision. Best for modern minimalist displays. |
| OnTheRocks | 2.5" Crystal Spheres | 90% | Excellent for longevity. The sphere shape resists melting the best. |
| Silicone Donut Molds | Hanging Bird Feeders | 75% | Great for DIY beginners. The hole in the middle makes hanging a breeze. |
| Rigid Plastic Trays | Large Scale Blocks | 60% | Only recommended if using the "cooler method" for directional freezing. |
Maintenance Note: Over time, silicone molds can absorb "freezer smell" from frozen foods, which can cloud the sensory experience of your ice art. To fix this, place your clean, dry silicone molds in a 350ºF (175ºC) oven for 20 minutes. This off-gasses any trapped odors and leaves your molds (and your ice) smelling neutral.
Conclusion: Keeping the Heart Warm in the Cold
The philosophy of Sayuki Ueno is a reminder that the garden doesn't die in winter; it simply changes state. By creating these frozen herbariums, we aren't just making "ice cubes"; we are practicing a form of seasonal mindfulness. We are learning to see the beauty in a dried leaf or a gnarled twig, and we are finding ways to bring the outdoors in, even when the thermometer drops below zero.
As you place your first herbarium on your porch or hang it from a bare branch, take a moment to watch how the light interacts with the trapped botanical. It is a fleeting masterpiece—one that will eventually melt and return to the soil, leaving you with nothing but the memory of its crystal-clear beauty.
FAQ
Q: How long will a frozen herbarium last indoors? A: Indoors at room temperature, a 2-inch cube will typically last 2 to 4 hours. To extend its life, place it in a chilled glass bowl or on a bed of crushed ice.
Q: Can I use fresh flowers from a florist? A: Absolutely, but be aware that some commercially grown flowers are treated with waxes that can cause cloudiness. Always rinse them in cool, filtered water before freezing.
Q: Why did my ice crack when I took it out of the freezer? A: This is usually due to "thermal shock." Let the mold sit at room temperature for 5-10 minutes before attempting to remove the ice. This allows the ice to "temper," making it less brittle.
Q: Is it safe for birds to eat the berries from the ice? A: Yes, provided you use bird-safe plants like rosehips, hawthorn, or sunflowers. Avoid using any plants treated with pesticides or those known to be toxic to local wildlife.